The Steamer Trunk Quilt

IMG_1098.JPG

Where does the time go?.... I was planning to write up this piece on the blog last week and here we are...it's the beginning of another week already!!!!  I have been working on a few things... a baby quilt (more about that soon)..... Putting borders on Will's quilt too...(more about that soon too) but, events outside the sewing room have taken over the last week or so.   A spot of decorating has been going on here and finally, I am so happy to have got our sitting room sorted out.  We moved into our house in June last year and although most of the house didn't really need decorating, the main Sitting Room, certainly did.  I had planned to have it all done by Christmas, but some water leekage problems caused delays and with hindsight, this was maybe not a bad thing.  We have weathered a Yorkshire winter in the house and seen the room in different lights and had more than enough time to decide what to do.  I am so excited by the results that I just had to make a quilt to go in there.   It is a lovely big room, with a beautiful wooden floor and a large stone fireplace.  It needed brightening up and I think I have certainly done that.  I had a vision of what I was trying to achieve, taken from a tiny cutting out of a magazine and the memory of a couple of houses that I have glimpsed over many years of moving around, one of them from over 20 years ago, but still indelibly etched on my mind.   Do you ever do that? Carry an image around with you that you know one day will suddenly be what you are looking for?  Anyway, we have gone from this - to this.  We are still waiting for the new sofas to be delivered, but I just love it's cheerful feel.  Yellow makes a room sunny all year around!

My Kaffe Fassett diamonds quilt will live in here... but, let's be realistic..... one quilt is simply not enough.  This time though it was a new idea, not an old one that sent me into a heady spin in the sewing room.   Perhaps it was the fact that our room has treasures from our travels....pictures from our travels are at the framers too.... or perhaps it was just that I picked up this pattern at the last quilt shop stop in Houston, before I left for the airport last month, because I am a sucker for anything to do with Steamer Trunks and that glamourous image of travelling in days gone by.  

The pattern is called 'Bon Voyage' by Coach House designs and in the cover picture, it is a collection of pretty pastel trunks, stacked on top of one another, as if waiting to be loaded up aboard a steamer bound for Suez or the midnight train to St. Petersburg.

Being more of a strong colour girl myself, I started rummaging in my stash for prints that reminded me of old Steamer Trunks.  It was easy.... the blocks started coming together rapidly - it is a fast and easy project.  A little bit of Anna Maria Horner fabric, a touch of Amy Butler and a dash of Kaffe Fassett and suddenly you have an explosion of colour.

Using these bold prints also allows some fussy cutting to use the design.  For example, I think this lovely circular motif will make a fab lock for one of the trunks.  

I used a new idea that I had recently seen on the internet to do this.  First of all cut out the motif with plenty of fabric to spare around the edge.  Lay it, face down on to similar size piece of muslin or any other old piece of fabric.  Stitch all the way around the edges, using your motif as your stitch line guide.

Then once it is turned out, give it a good press to be sure it is nice and flat.

I altered some of the fastening details - there is an assortment of templates for the locks and straps and you can fussy cut some fabrics to create the desired effect.  The appliqué bits and bobs are done using the freezer paper technique and I like to do this. 

I machined the pieces down though, rather than hand sewing them, partly because this is just going to be a fun quilt that will laze on our Chesterfield.

It was just a days work to get to this point.... and is a great project for a beginner.   I love how it looks and how the jumble of patterns and colours go together.  I still have alot of stitch detail to work, but I think that my Janome is going to help with this.   My luggage seems pretty exotic to me.... definitely headed to far away lands.   Now that I basically have my stack, I have to think about the accompanying background and I rather like the idea of newsprint and text fabric.  I am going to experiment with this idea, so hope you will come back next week and see how it is shaping up.   Oh and I think maybe a few luggage labels could be fun too... don't you?

See you soon, Ruby x 
Tessellation-ing!

How time flies when you're holed up in the sewing room on rainy yorkshire days.  Hot on the heels of ...and a little flushed with enthusiasm for.... finishing my last quilt - I am racing ahead towards another finish.  This time it is a special one.  This quilt is for my boy William, who started University in London last Autumn and yes, of course it was supposed to  be ready for that and yes, of course, as usual, I totally underestimated how long it would take to make - BUT (pause for a breath) this is a project that is just so perfect for a thoroughly modern, busy, sporty, techy, always connected - guy about town.  But before I show you some photos - a little recap.  When my first boy went off to Uni, a little way back, I was quite new to quilting.  I made him a 'New York' quilt with some fabrics that I had bought on a family trip to the US not long before and because he was totally enamoured with NYC (who isn't).  At this point, I didn't really know what a 'guy' quilt might be and used a pattern from my very first quilt book by Fons &  Porter.    I just wanted him to have something to take away to college, to brighten up those student nights when you need a little bit of home with you.   It turned out to be quite a success and just the right sort of thing.  Despite 3 years of university life, it is still in his room and very much Joe's quilt.

New York Quilt.JPG

When our daughter went away to college, I embarked on the epic - Gone with the Wind quilt, which lives with her at Warwick University and is much loved and snuggled under.  (There is a whole album on the sidebar about this 'production' called 'A Patch of Scarlett')

So now our youngest is off the launchpad, it was time for the last 'University' Quilt.  I thought that this boy, though, was the least interested in my quilting and fabric obsession and perhaps wasn't all that bothered - until I mentioned it.  The instructions were - something modern - grey and green and blue and absolutely NO flowers.   By now though - I was much more up to the moment with all things quilty and I knew exactly where to go for the pattern.

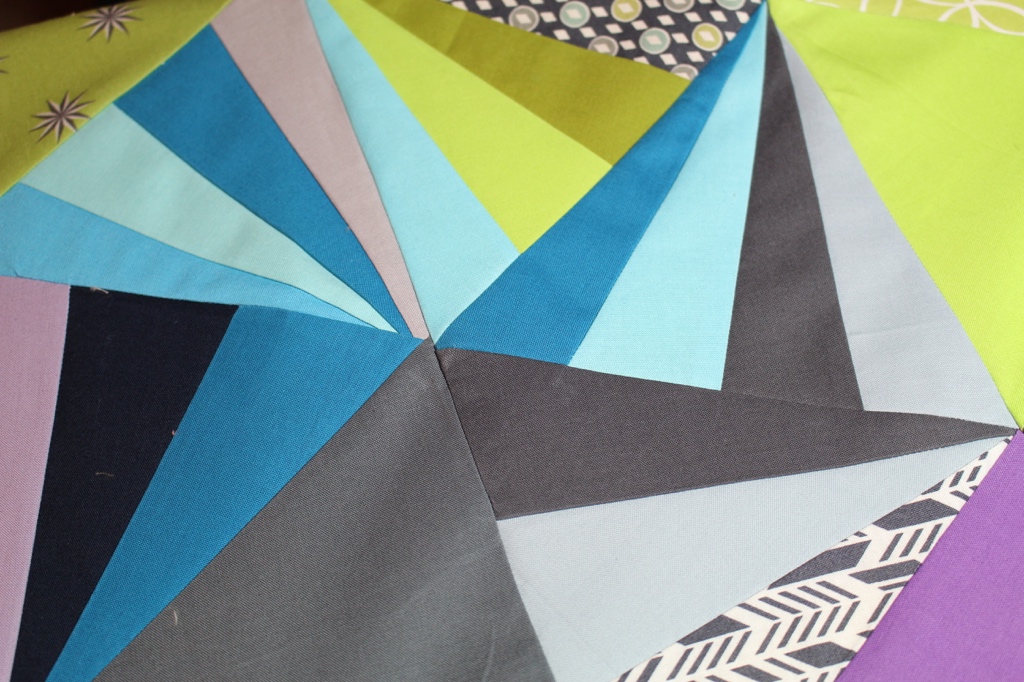
'Tessellation' by Alison Glass is just a wonderful quilt pattern.  I have seen alot of totally AMAZING versions of it on Instagram and it is just completely perfect for a modern student.   While of course, I struggled initially with the 'NO RED' idea (a few minor palpitations there), in fact the fabric choices came together rather easily.  I had thought to do all solid colours, with no prints at all, but as it happened, my daughter had brought back a couple of very modern bits of fabric from Citiquilter in NYC last summer and these text print fabrics just lifted the solid colours a tad.

The pieced blocks are done using foundation papers and this is a good project if you are new to that technique as you can put in as many or as few as you like.   There are loads of tutorials about how to do this online, so I won't explain here - except to say that I have tried alot of different types of paper for this and my absolute favourite is 'SIMPLE FOUNDATIONS" by C&T publishing.  These translucent vellum papers are strong and easy to use and are easily available from www.cottonpatch.co.uk.  Arranging the pieces is so much fun and using the stars as my starting point, made it easy to decide on the rest of the triangle.  

Tesellations3.jpg

In fact the rest of it is just a sort of higgledy-piggledy modern art mishmash, spacing your colours out so that it is fairly evenly distributed without looking like it was conscious placement.

Even though I have made quite a lot of quilts now, I always learn something new each time and this time, it was the importance of 'PRESSING'.  In a quilt like this with lots of triangles and biased edges that can stretch - spray starching and pressing is essential, absolutely all the way down the line.  Keep each row immaculately pressed with all the seams lying flat and it will help enormously to line the triangles up with the next row and to help the quilt to lie flat.

Tesellations4.jpg

I think it is perfectly fine to clip your seams too, if you find it sits better one way at one end and one way at the other end -after all we clip seams in dressmaking, so why not.  Use steam, lots and lots of it and just keep pressing everytime you join a piece in.  I am lucky enough to have a sewing table that gives me the chance to have a pressing board and iron alongside me when I sew and this is enormously helpful.  One other thing that was just SO useful when working on this project was a sturdy 15" rotating cutting mat makes trimming shapes super fast and efficient.   I first saw it about 6 months ago on the internet, when Kimberly at www.fatquartershop.com featured it as one of the best bits of quilting equipment around and I have to agree that it is a 'must have' in my sewing book.

So it is all together now and I think it is going to be a great quilt to actually quilt.  I plan to put a navy border around the edge - quite  a deep one, which will give me the opportunity to do some modern filler stitches in what now seems to be called 'negative space'.  I also have alot of scraps left and I don't like to waste fabric, so I might try and put together a scrappy binding for the quilt.  I'll let you know how I get on with that soon.   Meanwhile, for today at least....I shall just sit back and enjoy looking at it.    I hope he likes it...... think he will........

IMG_1992.JPG
Cross stitch quilt label.JPG

Oh.... and what's more.....a new blank design space is now staring at me from my wall.....mmmm  have to do something about that I think..... maybe it is time to try little designing of my own........

Such a tidy sewing space ! Don't suppose it will stay like that for long LOL!  Love Ruby x